Watching YouTube videos not available in your region using a VPS abroad
Sometimes you might go to YouTube to look for a video or song you once saw or heard somewhere and liked, and then realize that the content you want is not available in your region. Luckily, there is a solution to this problem.
What you need
Firstly, you need a VPS located in another region where the wanted content is available. For example, using a VPS located in a London data center will give you an opportunity to access YouTube content available in the UK. For the purpose of this tutorial, I use a Vultr VPS in London. Download PuTTY if you're on Windows; if you're on GNU/Linux, use the default SSH package included with your distribution. The same goes for macOS: use the default SSH client that comes with your Mac.
Preparing your VPS
Before you can use your VPS as a SOCKS proxy, you need to prepare the OS: register a new account (if you still haven't got one) with Vultr and choose the location of your server and the server type (OS that's going to be installed). Alternatively, you can provide a custom image for OS installation, but I don't recommend that for beginners. It's sufficient to select one of the pre-built images. I use CentOS, select that to follow this tutorial easier. For location, choose the country where your liked content is available. Regarding the server size, both the cheapest option for $5/month (1 CPU with 1024 MB of RAM) and the more expensive one for $10/month (1 CPU with 2048 MB of RAM) work well. You don't need any additional features. You can jump to last section called Server Hostname & Label. There you can type the name of your server without spaces, preferably in lowercase letters (for example, my-proxy-1). The server label is the identifier used in the Vultr control panel. You can type anything you like in a mixture of lowercase and uppercase letters as desired. Once you've got the IP address and the login credentials, login to your VPS as instructed in your registration e-mail, make sure you are logged in as the root user, and execute the commands shown below.
1 2 | firewall-cmd --list-all | grep ssh iptables -nvL | grep 22 |
If port 22 is open on your server, you'll get output like the one shown below.
1 2 3 4 5 | firewall-cmd --list-all | grep ssh services: dhcpv6-client ssh iptables -nvL | grep 22 31157 1869K ACCEPT tcp -- * * 0.0.0.0/0 0.0.0.0/0 tcp dpt:22 ctstate NEW |
If you can see ssh in the service list output by the firewall-cmd command and tcp dpt:22 output by iptables, you're good to proceed and login via SSH.
Windows
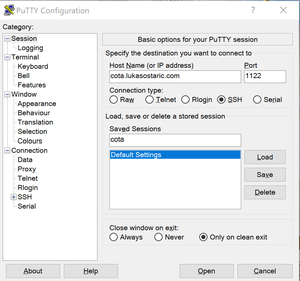
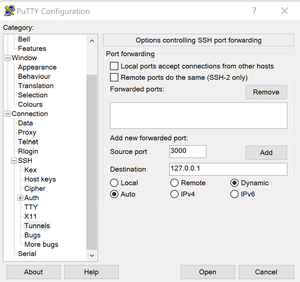
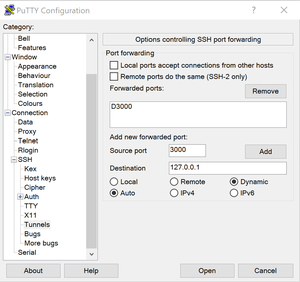
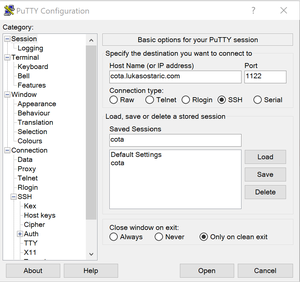
If you're on Windows, start PuTTY, enter the IP address you got from Vultr earlier, leave port 22, below Saved Sessions enter my-proxy-1, and then click Save. Choose your newly created session and click Load. After that, expand the SSH section from the Category menu on the left. Under the SSH submenu, select Tunnels. There will be one input field called Source Port. This is the port on your local machine that you will be using to create a SOCKS tunnel. We'll choose the port 3000 for the purpose of this tutorial. You can check if that port is free on your machine by opening the Command Prompt and entering the command below.
1 | netstat -a | findstr "127.0.0.1:3000" |
If you don't get any output, it means the port 3000 is free on your machine. Press Ctrl + C to quit, and close the Command Prompt window. If the port is currently in use, check for another port (for example, 3001). When you're sure the port is not in use, you can enter it in the Source Port field in PuTTY. Enter 127.0.0.1 in the Destination field, select Dynamic, and then click Add. After that, you should see something like D3000 under Forwarded Ports. Go back to Session using the Category menu on the left and click Open. Log in to your VPS as usual and minimize the PuTTY window. Now open Mozilla Firefox, select the menu icon in the top-right corner of the screen (three bars), go to Options, select General, scroll down to the bottom until you see the Network Settings section, and then click on the Settings button. Under Manual proxy configuration choose localhost and 3000 in the SOCKS Host field for the host name and port, respectively. Click OK. Now you should be able to browse the content not available in your region.
macOS
Open Terminal and execute the command shown below.
1 | ssh -D 3000 root@your-vps-ip
|
Enter your username and password. After you've logged in, open Mozilla Firefox, select the menu icon in the top-right corner of the screen (three bars), go to Options, select General, scroll down to the bottom until you see the Network Settings section, and then click on the Settings button. Under Manual proxy configuration enter localhost and 3000 in the SOCKS Host field for the host name and port, respectively. Click OK. Now you should be able to browse the content not available in your region.
Linux
The process is the same as in macOS: Open Terminal and execute the command below.
1 | ssh -D 3000 root@your-vps-ip
|
Login to your server using the username and password, and then open Mozilla Firefox, select the menu icon in the top-right corner of the screen (three bars), go to Options, select General, scroll down to the bottom until you see the Network Settings section, and then click on the Settings button. Under Manual proxy configuration, enter localhost and 3000 in the SOCKS Host field for the host name and port, respectively. Click OK. Now you should be able to browse the content not available in your region.